Custom domain mapping allows you to display your Sermon Send pages using your own church's domain name, creating a seamless branded experience for your audience. Instead of sharing links with the default Sermon Send URL, visitors will see your own church-branded URL when accessing your sermon content.
Watch the overview here:
Benefits
- Maintains consistent branding across all your digital content
- Creates a more professional, integrated experience for your congregation
- Improves trust and recognition when sharing sermon links
- Seamlessly integrates Sermon Send features into your existing web presence
Requirements
- An active Sermon Send account
- Access to your domain's DNS settings
- A subdomain you want to use (example: sermons.yourchurch.com)
Step-by-Step Setup Guide
1. Access Custom Domain Settings
- Log in to your Sermon Send dashboard
- Navigate to the Settings section
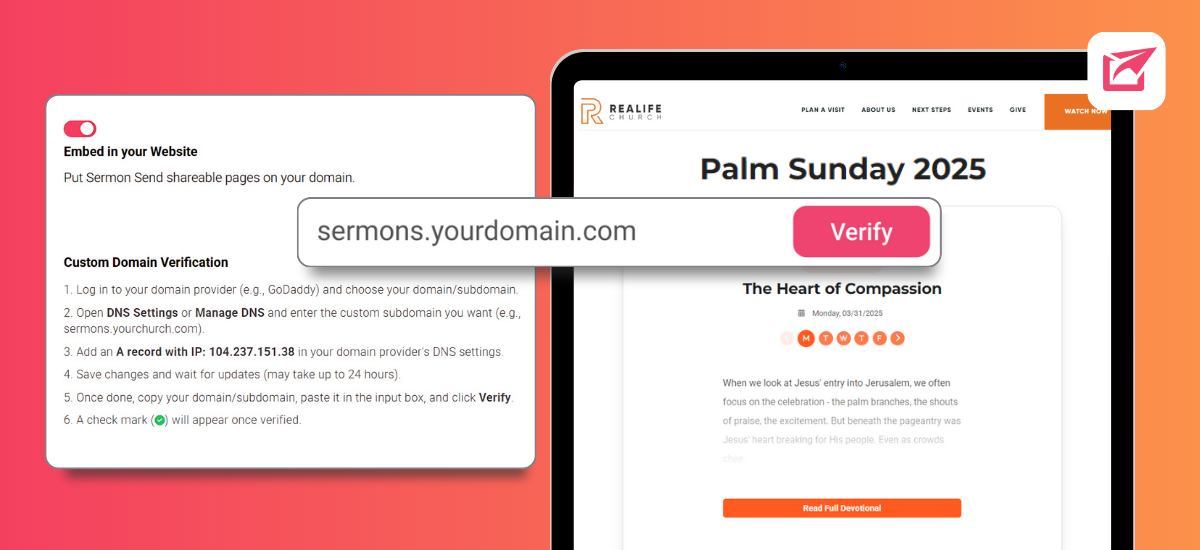
- Click on the "Embed in your website" option

2. View Custom Domain Instructions
- The system will display instructions for configuring your custom domain
- You'll need to create an A record in your DNS settings using the IP address provided
3. Create a DNS Record
- Log in to your domain registrar or DNS provider (examples: GoDaddy, Cloudflare, Namecheap)
- Navigate to the DNS settings for your domain
- Click "Add new record"
- Select record type: A
- Enter your desired subdomain in the Name/Host field (e.g., "sermons-pages" if you want sermons-pages.yourchurch.com)
- Enter the IP address provided by Sermon Send
- Set TTL to 600 seconds (or whatever your provider allows)
- Save the record
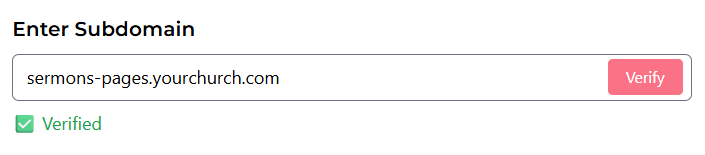
4. Verify Your Domain
- Return to the Sermon Send dashboard
- Ensure your custom subdomain is entered correctly (in the above example, it should be sermons-pages.yourchurch.com)
- Click the "Verify" button
- If successful, you'll receive a confirmation message that your domain has been verified and see a "Verified" flag
5. Wait for DNS Propagation (if needed)
- DNS changes can take anywhere from a few minutes to several hours to fully propagate
- If verification fails initially, wait some time and try again
- The system will issue an SSL certificate for your custom domain once verified
6. Start Using Your Custom Domain
- Once verified, copy your new custom domain URL
- All your Sermon Send pages will now be accessible through your custom domain
- You can navigate through your entire Sermon Send content using your branded URL
- Share your sermon pages using your new church-branded URL
Next Steps: Add your custom domain to your website (optional)
If you prefer, you can add your custom subdomain to your website. This will involves your church's website infrastructure and will need to be handled by you or your website team. Sermon Shots provides an overview on how this can be done to help you communicate effectively with your website administrator, but the actual implementation is managed on your end. This approach gives you complete control over how and where your sermon content appears on your site!
Once your custom domain is verified and active, you can add your Sermon Send pages on your website. This typically requires help from your website administrator:
- Provide your custom domain URL to your website administrator
- Let your administrator know where on your website you'd like the custom subdomain to be placed
- After your administrator completes the process, test it by accessing the subdomain directly and from where it was placed on your website
Troubleshooting Tips
- Ensure there are no trailing spaces in your DNS record entries
- Double-check that you've selected the correct record type (A record)
- If verification fails, allow more time for DNS propagation and try again
- Make sure you're entering the exact subdomain you created in your DNS settings
Need Help?
For additional questions or troubleshooting, please refer to the detailed support articles above or visit your live stream service's help center.
If you encounter any issues or have questions about uploading via live stream, the support team is available to assist you. Contact support at contact@sermonshtos.com.